Making Marauder's Tires
|
|
Here is some more information on how I created Marauder's Tires. At the time
I did this, the most sophisticated tool that I owned was a dremel drill.
|
|
|
|
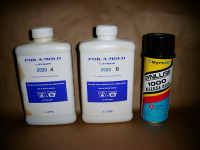
Mold Making Compound
These are the containers that the plyurethane mold making material comes in.
I used Synair's
Pour-A-Mold (PAM-111)
which I purchased from Coast Fiber-Tek,
but most places that specialize in plastics also carry this or similar
materials. Industrial Paint & Plastics
also carries a variety of mold making materials.
Quentin Cobb
says
that I used PAM-2020 and not PAM-111 (apparently the 111 is
white and the 2020 is transparent, but I can't find any reference to PAM-2020
on Synair's website). Anyways, the containers say 2020 on them.
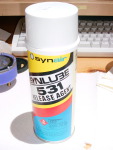
At the store they gave me SynLube 1000 as the release agent, and according
to the web site, this isn't the correct stuff. The web site mentions
SynLube 531 which is a wax based release agent. The SynLube 1000
didn't seem to work particularly well, so I think I'll need to look
into this further.
See below. The 531 works much better.
Bigger...
|
|
|
|
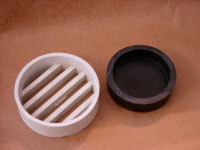
Mold Form Material
I went to Home Depot with the tire, looking for round things which might
be used to make a mold. The diameter of the wheel that came with the
Mark IIII is 2.58". I found a black end cap with an outside diameter
just a bit bigger than the Mark III wheel. The black end cap has an
inside diameter of 2.38" tapering down to 2.21", and the outside
diameter is 2.72" tapering down to 2.70". I'm not sure exactly what size
of pipe this corresponds to. I also found the white piece, which had an
inside diameter a bit bigger than the outside diameter of the black piece.
Bigger...
|
|
|
|
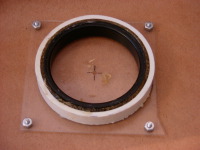
The Mold
I cut a piece of clear plastic about 4" sqaure, and drilled a hole in the
center and each of the 4 corners. The holes were big enough for a 4-40
screw. The corner screws were just to act like feet so that the whole thing
would sit level when the center screw was installed.
In order to locate the center of the black piece, I created another piece
of clear plastic, marked the center and drew a circle which matched the
inside diameter of the black piece. After cutting this out and ensuring a
snug fit, I drilled a very small hole in the center. I was then able to
rotate the clear plastic with the black piece fitted to ensure that the
hole was in the center. Once satisfied, I drilled the center out to
accomodate a 4-40 screw.
Screwing the two clear plastic pieces together allows the black piece to be
positioned. I then glued the white piece to the square plastic piece,
leaving a space all around the black piece. Getting the white piece
centered isn't important, and for that matter it could be any shape that
is desired. The round clear plastic piece is missing from the picture (just
in case you were wondering).
I sprayed the black piece with mold release and put some petroleum jelly
on the portion that touches the clear square plastic piece. I then mixed
some mold making material and put it between the black and white pieces.
Don't try to use heat to accelerate the drying process, it just causes lots
of air bubbles to form! After about 6-8 hours the black piece (and the
clear round piece) can be removed. I let the mold cure for a couple days
after that.
Bigger...
|
|
|
|
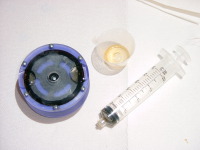
Making the Tire
When mixing the two portions of the mold making material together, I found
it easiest to use one of those small mixing cups that holds 1 fluid ounce
(about 30 ml), and poured both components into the same container. If you
use separate containers you need to compensate for the stuff that gets left
behind. If you don't get the mixture at 1:1 then it won't set properly.
Due to the difficulty I encountered getting the black piece out of my mold
(probably due to using the wrong mold release), I decided to line the inside
of the mold with aluminum foil. You can see a piece of it here. I used some
of the petroleum jelly to "stick" the foil to the side of the mold. The
picture I took here was after the I finished both tires, so the foil was
just placed there.
I also filed eight half round pieces around the edge of the wheel (not
present in this picture, but visible in the next picture). I mixed the
mold making material (it only takes 10-15 ml) and poured it using a
toothpick across the top of the mixing container (the mixed material
flows along the toothpick, allowing precise placement. When mixing the
two portions, don't be too vigourous. You don't want to introduce air
bubbles.
Bigger...
|
|
|
|
Finished Tire
This is the finished tire. The little ridges you see (visible in the
lower left corner) are from me sawing excess material away with my
X-acto knife. This stuff is hard to cut (not because it's hard, but because
it's too flexible). You want a super sharp blade!
The tires pick up any dust they come in contact with, so I use rubbing
alcohol to clean the tires between rounds.
The tires are sticky enough, that if I leave Marauder with clean tires on
a flat surface for about half an hour, the tires "stick" to the surface
and you need to carefully peel away the tires from the surface. I normally
leave the tires dusty, or rest Marauder on it's back.
Bigger...
|
|
|
|
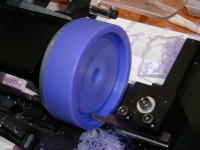
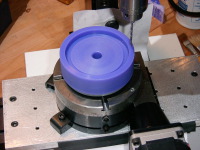
Making a new Mold
The mold pictured above was created before I got my Sherline mill and
lathe. Since I was going to make some more tires, I decided to make a new
mold. I started using some purple UHMW that I picked up at Lee Valley.
I cut the very rough circle out by hand using a scroll saw.
I knew the mold was going to be too big to put in the Sherline chuck, so
I mounted it to the faceplate.
Bigger...
|
|
|
|
|
|
|
|
|
|
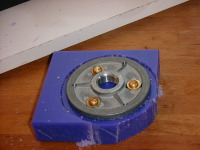
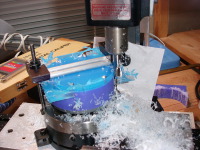
Drilled
I then mounted the face plate on the rotary table in order to drill six
mounting holes around the outside edge. These were tapped for a 4-40 screw.
Bigger...
|
|
|
|
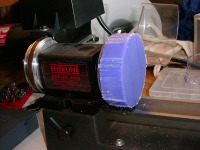
Make a cover
I made a clear cover out of some plexiglass. Once the general round shape
was roughed out on the mill, I cleaned it up on the lathe.
Bigger...
|
|
|
|
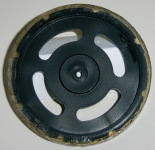
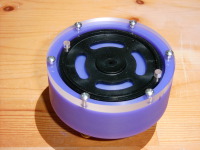
Mold Pieces
Here are all of the pieces required for the mold. The four brass bolts
are screwed in from the back into the 4 holes visible inside the mold. These
allow the tire to be ejected once the polyurethane has set.
Bigger...
|
|
|
|
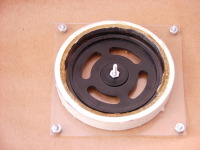
Assembled Mold
This is the assembled mold with a tire blank inserted. Polyurethane is
injected into one of the holes on the top, and the second hole allows the
air to escape.
Bigger...
|
|
|
|
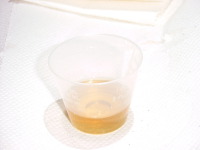
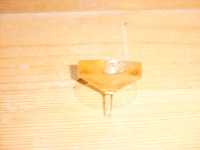
Polyurethane
This is the color of the polyurethane when it's mixed up. I typically only
make 10-15 ml using little mixing cups like these. For these small
quantities, I find it easier to measure by pouring both components directly
into the mixing cup rather than trying to measure them separately and
then mix them together.
Bigger...
|
|
|
|
Pouring the Polyurethane
Here's what it looks like when the polyurethane has been poured. The cloudy
appearance of the plexiglass is because both sides have been coated
with the mold release. Coating both sides makes removing the overflow
easier.
Bigger...
|
|
|
|
|
|
|
Syringe Plug
If you let the polyurethane in the syringe cure, you can pull the plug out
and reuse the syringe later.
Bigger...
|
|
|
|
|
Home
- Line Maze 2006
- Marauder
|