RCX modified to use a 9v battery
|
|
I needed to reduce the weight of my Lego Mini Sumo, so I decided to modify
my RCX to work from one or two 9 volt batteries rather than 6 AA cells.
This reduced the weight considerably. A 9v alkaline weighs approximately
44 grams; 6 alkaline AA cells weigh 142 grams.
Disclaimer
Modifying your RCX as outlined below WILL void any warranty that you might
have with Lego. Proceed at your own risk. You should only attempt to perform
these modifications if you feel confident that you're not going to screw
things up, and also be prepared to make your RCX completely non-functional.
|
|
|
|
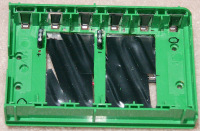
RCX Top with battery installed
Here's a picture of the modified RCX with a 9v battery installed. The
circled - in the the top right (front of the RCX with the infrared detector)
and the circled + in the bottom left are the ones that connect to the
microprocessor board.
You can see two 3 pin jumpers, labelled + and -. These jumpers are positioned
so that they're between the AA cells. When both jumpers are installed then
9v batteries can be used. When both jumpers are removed, then 6 AA cells can
be used.
Bigger...
|
|
|
|
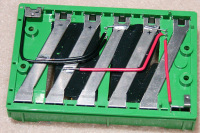
RCX Top with no batteries installed
Here's the same view, but with the batteries removed. I marked a + and -
just above the 9v battery spots so I can tell which way the 9v batteries
are supposed to be installed. The electrical tape is to ensure that 9v
batteries with metal cases don't short things out.
I had to cut holes in the green plastic in order to get the 9v batteries to
fit. I was able to leave enough plastic at the top and bottom so that the AA
cells don't "fall in".
Bigger...
|
|
|
|
Backside of RCX top piece
Here's a picture showing the wires which were added on the backside.
The red wires are positive and the black wires are negative. The + and -
written on the metal conductors are how the 9v batteries will be when they're
connected. The wires need to be very carefully positioned so that they
don't interfere with the surface mount chips and other discrete components
on the CPU board.
Bigger...
|
|
|
|
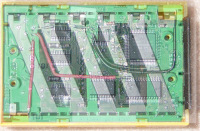
Superimposed
I took a picture of the backside, mirrored it, and superimposed it on a
picture of the CPU board so you can see the wire routing. the 3 chips
in the bottom right are too high to have wire go over them. Similarly,
the three diodes on the left (one is just below the bend in the red wire)
are too thick to have a wire go over them. I had to trim back the 3 pin
header for negative side so it wouldn't interfere with IC in the top middle.
Bigger...
|
|
|
|
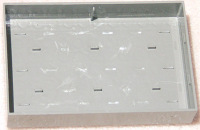
RCX Bottom
I also took a picture of the bottom portion of the battery case, since I
had to remove some if the protrusions here in order to get the case to
close nicely.
Bigger...
|
|
Home
- Line Maze 2006
- Lego
|